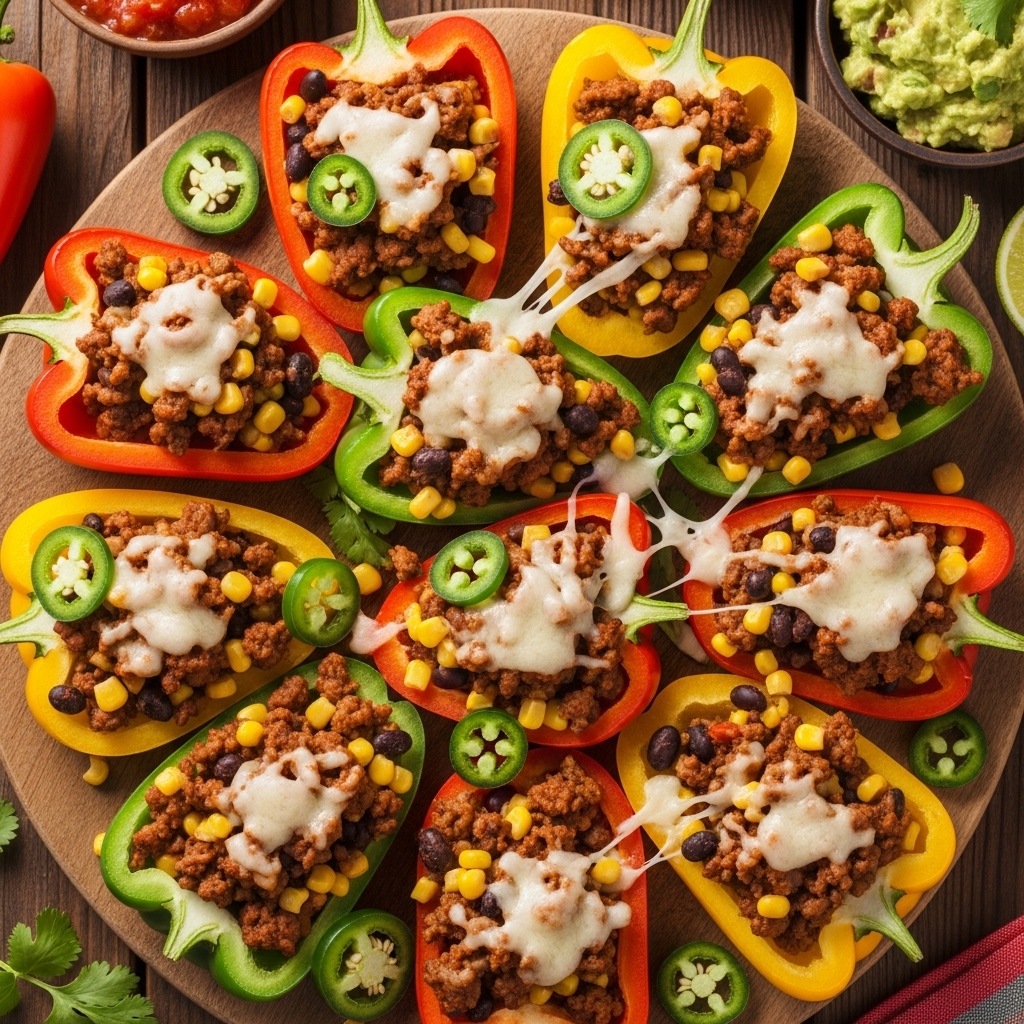
Bell Pepper Nachos
Crunchy Bell Pepper Nachos (Low Carb Bell Pepper Nacho Recipe)
Get ready to dive into a fiesta of flavor with these Bell Pepper Nachos! This delightful twist on a classic favorite swaps out traditional tortilla chips for vibrant, crunchy bell peppers, creating a low-carb snack that’s just bursting with goodness. Picture jewel-like bits of colorful peppers topped with seasoned ground beef, black beans, sweet corn, and gooey cheese—it’s a party on a plate that’s perfect for any gathering or cozy night in!
Why You’ll Love This Recipe
These Bell Pepper Nachos are more than just a great appetizer; they’re a celebration of flavors and textures!
– Big, Bold Flavors: Enjoy the zesty taco seasoning melding perfectly with the sweetness of corn and the savory notes of beef.
– Crowd-Pleaser: A surefire hit at parties, making it a fantastic option for game day or family gatherings.
– Flexible & Fast: This recipe is customizable and can be whipped up in just 30 minutes, making it an ideal weeknight meal.
– Healthy Indulgence: With all the flavor and none of the carbs, you can indulge without guilt!
Ingredients You’ll Need
To create these mouthwatering Bell Pepper Nachos, you’ll need a few simple ingredients that pack a punch. The star of the show? Those gorgeous bell peppers! They add a delightful crunch and a pop of color to your plate. Here’s what you’ll need:
– 6 large bell peppers
– 1 pound ground beef or ground turkey
– 2 tablespoons taco seasoning
– ¾ cup black beans (rinsed and drained)
– ¾ cup sweet yellow corn (thawed)
– 1 jalapeño (sliced, optional)
– ½ to 1 cup reduced-fat shredded Mexican cheese blend
*Note: You’ll find the complete list of ingredients, along with their exact measurements, in the printable recipe card at the bottom of this post.*
![Bell Pepper Nachos]()
Variations
One of the best parts about these Bell Pepper Nachos is how easily they can be customized to suit your taste! Here are some fun variations to try:
– Go Gluten-Free: Ensure your taco seasoning is gluten-free or make your own with spices you love.
– Add Extra Protein: Swap in shredded rotisserie chicken, cooked shrimp, or even blackened tofu for a different twist!
– Make it Spicier: Toss in extra jalapeños or a drizzle of your favorite hot sauce for a fiery kick.
– Swap the Dressing: Instead of shredded cheese, try a creamy avocado dressing to drizzle on top.
– Colorful Additions: Mix in diced tomatoes, olives, or chopped cilantro for added flavor and a pop of color!
How to Make Bell Pepper Nachos
Ready to get cooking? Follow these simple steps to create your very own Bell Pepper Nachos!
Step 1: Preheat and Prepare
Preheat your oven to 375°F (190°C). Get your baking sheet ready by coating it with nonstick oil or lining it with parchment paper to prevent sticking.
Step 2: Slice and Dice
Grab your bell peppers and use a small sharp knife to remove the stems. Slice each pepper in half and then each half into three equal sections. You’ll create 6 “chips” from each pepper. Lay your vibrant bell pepper pieces on the baking sheet with the insides facing up.
Step 3: Cook the Filling
In a large skillet over medium heat, cook the ground beef or turkey until it’s browned and crumbled. Sprinkle in the taco seasoning and pour in ⅔ cup of water, stirring to combine. Add in the black beans, sweet corn, and jalapeños (if using) and mix until everything is heated through.
Step 4: Assemble and Bake
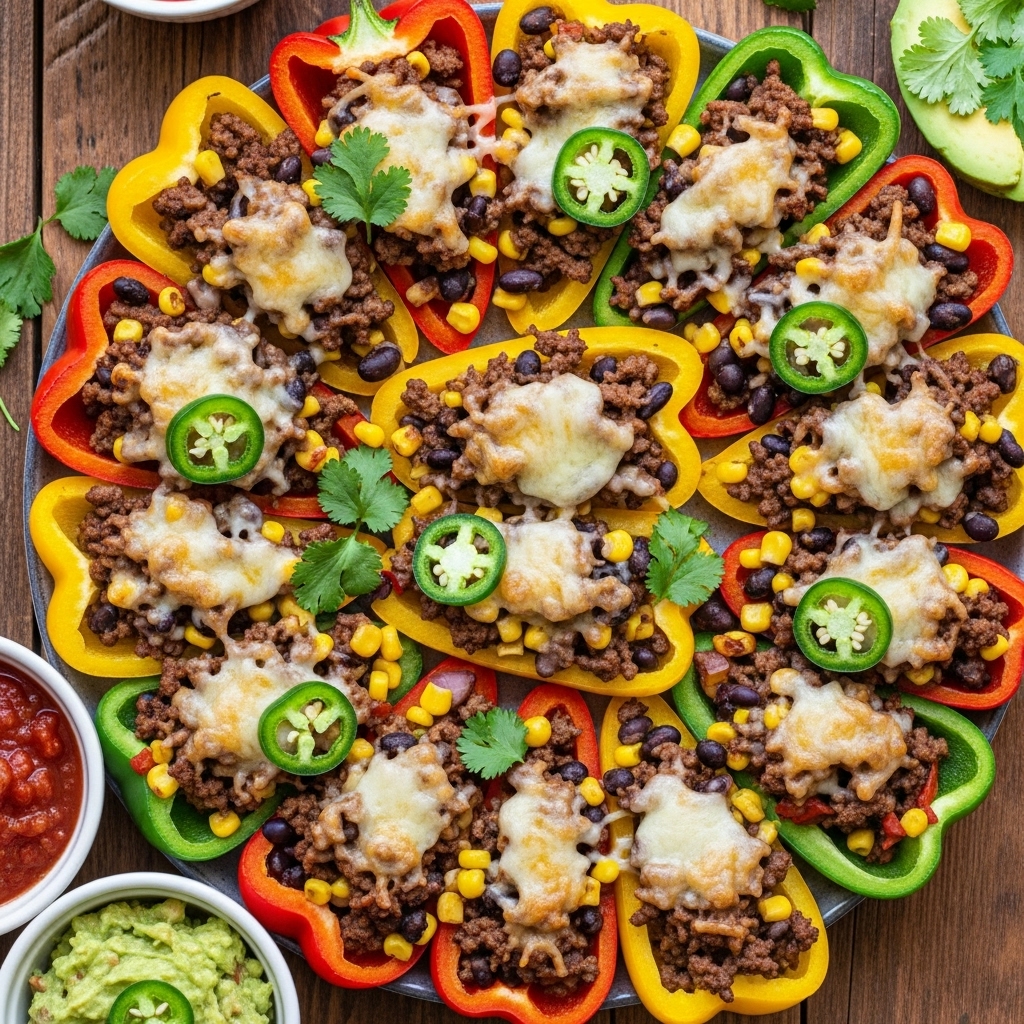
Spoon the flavorful filling generously over each bell pepper piece. Finish with a sprinkle of cheese on top. Pop the dish in the oven and bake for about 10 minutes, or until the cheese is all melty and bubbly!
Step 5: Serve and Enjoy
Take your Bell Pepper Nachos out of the oven and serve warm with your favorite toppings!
![Bell Pepper Nachos Ingredients]()
Pro Tips for Making Bell Pepper Nachos
– Choose Your Peppers Wisely: For a vibrant mix, consider using a combination of red, yellow, and green bell peppers.
– Don’t Overcook the Filling: Keep your filling juicy by not overcooking the meat mixture. You want it flavorful but not dry!
– Layer It Up: For extra crunch, let the bell peppers cool slightly before serving, allowing them to retain their crispness.
How to Serve Bell Pepper Nachos
Garnishes
Top your Bell Pepper Nachos with fresh cilantro, diced avocado, sour cream, or a squeeze of lime for that perfect finishing touch!
Side Dishes
Pair these nachos with a refreshing side salad, guacamole, or even a zesty salsa for a complete meal that’s bursting with flavor.
Creative Ways to Present
Serve your nachos on a large platter for sharing, or offer individual cups for a fun, portable snack option at parties!
Make Ahead and Storage
Storing Leftovers
If you have any leftovers (which is hard to believe!), store them in an airtight container in the refrigerator for up to 3 days.
Freezing
These Bell Pepper Nachos are best enjoyed fresh, but the filling can be frozen for up to 3 months. Just thaw before reheating!
Reheating
Reheat your nachos in the oven at 350°F (175°C) until warmed through and the cheese is melty again, or enjoy them cold for a refreshing snack!
FAQs
Can I use ground turkey instead of ground beef?
Absolutely! Ground turkey is a fantastic leaner option and works perfectly in this recipe.
Is this recipe spicy?
The heat level can be customized! Omit the jalapeños for a milder version, or kick it up a notch with extra spices.
How do I make this gluten-free?
Ensure that your taco seasoning is gluten-free and you’re good to go!
Can I prepare this in advance?
You can prepare the filling ahead of time and assemble your nachos just before baking for the best texture!
Final Thoughts
These Bell Pepper Nachos are not just a healthier alternative to traditional nachos; they’re a vibrant, fun dish that will light up any table! With their bold flavors, crunchy textures, and easy preparation, you’ll be the star of every gathering. So grab your bell peppers and unleash your inner chef—you’re going to love every bite of this delicious dish! Enjoy!
Bell Pepper Nachos

Delight in these easy, low-carb bell pepper nachos, a flavorful twist on a classic Mexican appetizer. Perfect for game days or casual gatherings, these nachos are made with fresh bell peppers instead of traditional tortilla chips, offering a healthier alternative without sacrificing taste. In just 30 minutes, you can whip up this satisfying dish that’s loaded with ground beef, black beans, corn, and gooey cheese. Serve them warm with your favorite toppings for an irresistible snack!
- Prep Time: 15 minutes
- Cook Time: 15 minutes
- Total Time: 30 minutes
- Yield: 6 servings 1x
- Category: Appetizer
- Method: Baking
- Cuisine: Mexican
Ingredients
- 6 large bell peppers
- 1 pound ground beef or ground turkey
- 2 tablespoons taco seasoning
- ¾ cup canned black beans (rinsed and drained)
- ¾ cup sweet yellow corn (thawed)
- 1 jalapeño (sliced, optional)
- ½ to 1 cup reduced-fat shredded Mexican cheese blend
Instructions
- Preheat the oven to 375°F. Coat a large baking sheet or two standard sheets with nonstick oil or line with parchment paper.
- Core and slice each bell pepper in half, then into thirds to create 'chips.' Lay them cut-side up on the prepared baking sheet.
- In a skillet over medium heat, cook the ground beef until crumbled and browned. Stir in taco seasoning and water; mix well. Add black beans, corn, and jalapeños (if using), heating through.
- Spoon the beef mixture over the bell pepper pieces and sprinkle cheese on top. Bake for about 10 minutes or until cheese melts.
- Serve warm with your favorite toppings.
Nutrition
- Serving Size: 1 serving
- Calories: 243
- Sugar: 3g
- Sodium: 405mg
- Fat: 14g
- Saturated Fat: 6g
- Unsaturated Fat: 7g
- Trans Fat: 0g
- Carbohydrates: 15g
- Fiber: 4g
- Protein: 14g
- Cholesterol: 65mg