Classic Cannoli Squares That Will Wow Your Taste Buds
Delectable Cannoli Dream Bars (Classic Cannoli Squares That Will Wow Your Taste Buds)
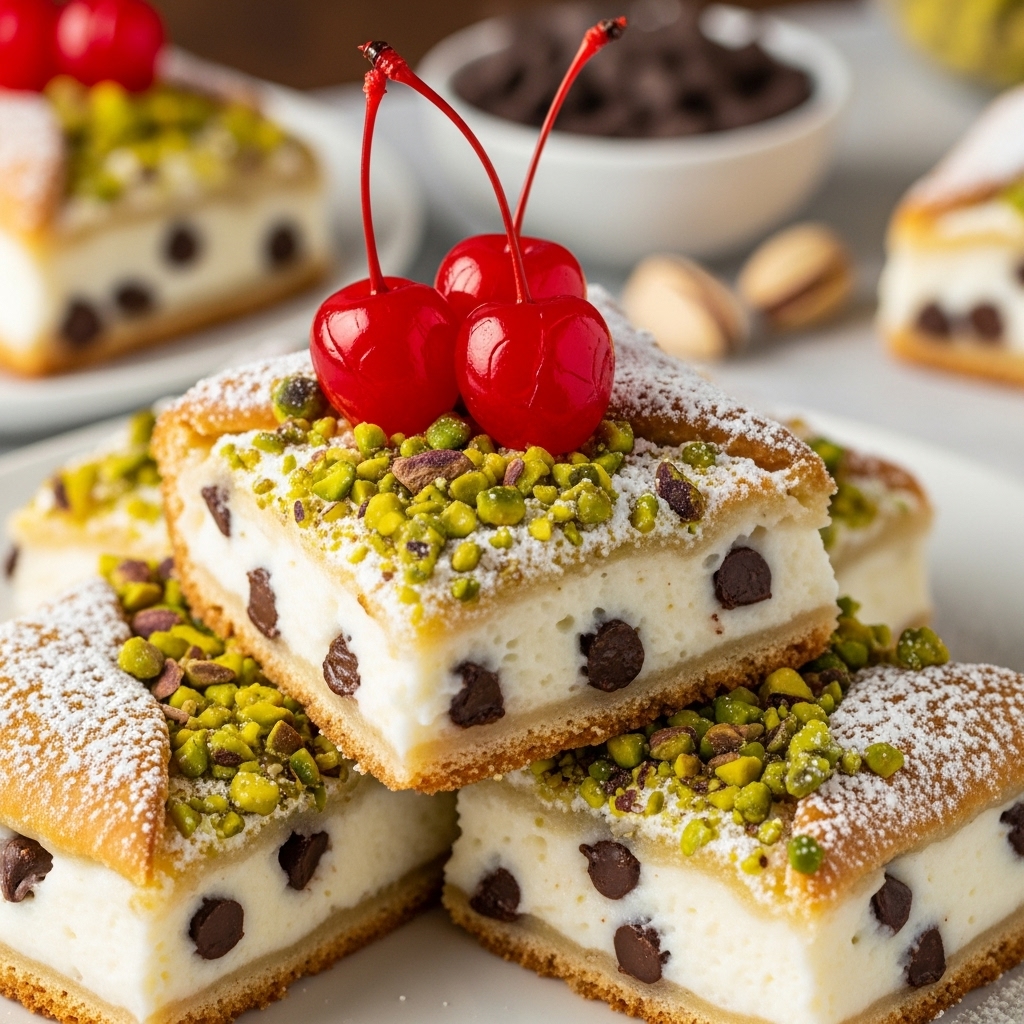
If you’ve ever dreamed of indulging in a classic Italian dessert but found yourself short on time, then these Delectable Cannoli Dream Bars are your new best friend! With a creamy ricotta filling nestled between two flaky pie crusts, these squares pack all the rich, velvety goodness of traditional cannoli into a delightful, easy-to-share format. Each bite is a celebration of flavors, from the sweetness of chocolate chips to the aromatic hint of cinnamon. Trust me, your taste buds are in for a treat!

Why You’ll Love This Recipe
Get ready to fall head over heels for these Cannoli Dream Bars. Here’s why they’ll become a staple at your dessert table:
– Big, Bold Flavors: The combination of creamy ricotta, sweet chocolate, and a hint of cinnamon creates a flavor explosion that delights every palate.
– Crowd-Pleaser: Perfect for gatherings, potlucks, or a cozy night in – everyone will be reaching for seconds!
– Flexible & Fast: This recipe is straightforward and quick, making it ideal even for beginner bakers.
– Make-Ahead Magic: Prepare them in advance and enjoy the sweet satisfaction of having dessert ready to go when you need it!
Ingredients You’ll Need
Let’s gather our ingredients and get ready to create these luscious Cannoli Dream Bars! The ingredients are simple, yet they come together to create something truly special. Two flavor game-changers here are the creamy ricotta cheese and the luscious mini chocolate chips that bring everything to life!
– 2 cups Ricotta Cheese (use whole milk for a richer texture)
– 1 cup Powdered Sugar (substitute with coconut sugar for a healthier option)
– 1 teaspoon Vanilla Extract (opt for pure vanilla for the best taste)
– 1/2 teaspoon Cinnamon (omit if you prefer a classic cannoli flavor)
– 1/2 cup Mini Chocolate Chips (dark chocolate enhances richness)
– 2 pre-made Pie Crusts (homemade crust works beautifully, too)
– 1 large Egg (for an egg wash that gives a glossy finish)
– Sugar (for sprinkling) (adds a sweet crunch on top when baked)
– 1/4 cup Chopped Pistachios (offers a delightful crunch and color)
– 3 pieces Maraschino Cherries (adds a pop of sweetness and decoration)
– 1/4 cup Extra Chocolate Chips (for those who can’t get enough chocolate)
*Note: You’ll find the complete list of ingredients, along with their exact measurements, in the printable recipe card at the bottom of this post.*
Variations
Feeling creative? These Cannoli Dream Bars are incredibly customizable! Here are a few variations to consider:
– Go Gluten-Free: Swap out the pie crusts for gluten-free alternatives to cater to dietary needs.
– Add Extra Protein: Toss in some Greek yogurt with the ricotta for a protein boost.
– Make it Spicier: For a unique twist, add a pinch of nutmeg or a splash of orange zest to the filling.
– Swap the Dressing: Use almond extract for a different flavor profile that complements the ricotta beautifully.
– Colorful Additions: Fold in some fresh berries or dried fruit for a pop of color and flavor.
How to Make Classic Cannoli Squares That Will Wow Your Taste Buds
Ready to whip up these decadent treats? Just follow these easy steps for Cannoli Dream Bars that will leave everyone asking for your secret!
Step 1: Preheat and Prepare
Preheat your oven to 375°F (190°C). While that’s heating up, grab your pie crusts and prepare your baking dish.
Step 2: Mix the Filling
In a large mixing bowl, combine the ricotta cheese, powdered sugar, vanilla extract, and cinnamon. Stir until smooth and creamy, then fold in the mini chocolate chips. This will be the luscious filling that dreams are made of!
Step 3: Assemble the Bars
Fit one pie crust into your baking dish, pressing it gently against the bottom and sides. Pour the creamy filling into the crust and spread it evenly.
Step 4: Top It Off
Lay the second pie crust over the top of the filling, gently crimping the edges to seal in all that delicious goodness. Brush the top crust with a beaten egg for that beautiful golden finish, and sprinkle a little sugar over the top for added sweetness.
Step 5: Bake to Perfection
Pop the dish into the oven and bake for about 35 minutes, or until the crust is golden and flaky. Your kitchen will soon be filled with the heavenly aroma of baked goods!
Step 6: Cool and Serve
Once baked, allow your Cannoli Dream Bars to cool completely in the pan. After that, slice them into squares, top with chopped pistachios and a maraschino cherry, and get ready to indulge!
Pro Tips for Making Classic Cannoli Squares That Will Wow Your Taste Buds
– Chill the Filling: For an even creamier texture, chill your ricotta mixture for about 30 minutes before filling the crust.
– Don’t Rush the Cooling: Let the bars cool completely before slicing to ensure clean, beautiful squares.
– Experiment with Toppings: Get creative with toppings! Consider a drizzle of chocolate or a dusting of cocoa powder for extra flair.
– Use Quality Ingredients: The better the ingredients, the better the flavor. Opt for high-quality ricotta and chocolate chips for a truly indulgent treat.
How to Serve Classic Cannoli Squares That Will Wow Your Taste Buds
Garnishes
Top your squares with a sprinkle of powdered sugar, a sprinkle of chocolate shavings, or a dollop of whipped cream for an extra indulgent touch.
Side Dishes
Pair these bars with a scoop of vanilla ice cream or a fresh fruit salad for a refreshing contrast that complements the richness of the cannoli filling.
Creative Ways to Present
Serve on a beautiful platter for a stunning centerpiece at your dessert table, or individually wrap them for delightful lunchbox treats!
Make Ahead and Storage
Storing Leftovers
Keep any leftover Cannoli Dream Bars in an airtight container in the refrigerator for up to 3 days. Trust me, they’ll taste just as delicious the next day!
Freezing
These bars can be frozen! Just ensure they’re tightly wrapped in plastic wrap and aluminum foil for up to 2 months. This way, you can always have a sweet treat ready at a moment’s notice!
Reheating
These bars are best served chilled or at room temperature. If you prefer them warm, pop them in the oven at 300°F (150°C) for about 10 minutes.
FAQs
Can I use low-fat ricotta?
Absolutely! While whole milk ricotta gives a richer flavor, low-fat ricotta can work just as well.
How do I make this gluten-free?
Use gluten-free pie crusts available at your local grocery store, and you’ll be good to go!
Can I prepare this in advance?
Yes! You can make these Cannoli Dream Bars a day ahead. Just keep them covered in the fridge until you’re ready to serve.
Is this recipe spicy?
Nope! This recipe is sweet and creamy, with just a hint of warm cinnamon. Perfect for satisfying your sweet tooth!
Final Thoughts
These Delectable Cannoli Dream Bars are more than just a dessert; they’re a celebration of flavors that transport you straight to the heart of Italy with every bite. They’re easy to make, ridiculously delicious, and perfect for sharing (or keeping all to yourself!). So gather your ingredients and let’s create something magical that will wow your taste buds and those of your loved ones. Happy baking!
Classic Cannoli Squares That Will Wow Your Taste Buds

Classic Cannoli Squares are a delightful twist on the traditional Italian dessert, offering a creamy ricotta filling nestled in a golden, crispy crust. Perfect for any occasion, these squares combine rich flavors with a satisfying crunch that will impress family and friends alike. Easy to prepare, they bring the essence of classic cannoli into a convenient and shareable form.
- Prep Time: 30 minutes
- Cook Time: 35 minutes
- Total Time: 1 hour 5 minutes
- Yield: Serves 9 squares 1x
- Category: Dessert
- Method: Baking
- Cuisine: Italian
Ingredients
- 2 cups Ricotta Cheese
- 1 cup Powdered Sugar
- 1 teaspoon Vanilla Extract
- 1/2 teaspoon Cinnamon (optional)
- 1/2 cup Mini Chocolate Chips
- 2 pre-made Pie Crusts
- 1 large Egg (for egg wash)
- Sugar (for sprinkling)
- 1/4 cup Chopped Pistachios
- 3 Maraschino Cherries
- 1/4 cup Extra Chocolate Chips
Instructions
- Preheat your oven to 350°F (175°C).
- In a mixing bowl, combine ricotta cheese, powdered sugar, vanilla extract, cinnamon (if using), and mini chocolate chips until smooth.
- Roll out one pie crust in a greased baking dish and pour the ricotta mixture over it.
- Cover with the second pie crust and seal edges. Brush with egg wash and sprinkle with sugar.
- Bake for 35 minutes or until golden brown.
- Let cool, then cut into squares and top with chopped pistachios and maraschino cherries.
Nutrition
- Serving Size: 1 square
- Calories: 280
- Sugar: 15g
- Sodium: 210mg
- Fat: 14g
- Saturated Fat: 6g
- Unsaturated Fat: 8g
- Trans Fat: 0g
- Carbohydrates: 35g
- Fiber: 1g
- Protein: 6g
- Cholesterol: 45mg